What Is Foreshortening?

Whether you’re drawing or painting, there are many different types of techniques you can use in your artwork. Foreshortening is one of them.  It is used in every two-dimensional art form from painting, drawing, illustration, graphics, and even representational quilting. Applied to everything drawn in perspective, foreshortening was a popular technique during the Renaissance. Learn more below.

Definition of foreshorteningWhat Is Foreshortening?

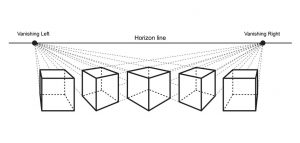
Foreshortening creates the illusion of an object receding into the background. It does so by making that object appear smaller and overlapped, thus enhancing the depth of a painting. Think of the classic drawing with a single road stretching out towards the horizon. As the road moves further away, it will appear narrower than it does closer to the viewer.

The effects of foreshortening

How does foreshortening affect the objects in a painting? In one of a few ways:

  • Objects become smaller the further away they are from the viewer
  • Objects up front will be larger and overlap objects further back

How to incorporate foreshortening

Foreshortening sounds simple, but in practice in can be difficult to understand for beginners. The key is practice. Start with drawing objects from real life and comparing individual shapes to better understand how objects appear at a distance. For example, you can sketch a building from a particular angle to learn how the back edge of the building appears smaller than the front edge. You can also try figure drawing with small wooden mannequins to see how foreshortening affects the body of living beings.

At Creative Ventures Gallery, our beginner classes can help you master the technique of foreshortening. To learn more, contact us today.

4 Ways Hobbyists Can Sell Their Artwork

You should always make art for the love of art, but getting a little extra money on the side doesn’t hurt either. While professional artists often rely on gallery representation to sell their artwork, hobbyists often need a simpler way. Thankfully, between the internet and local art shows, there are multiple ways to sell your art as a hobbyist.

Art Fairs and Art Shows4 Ways Hobbyists Can Sell Their Artwork

Local art fairs and art shows are always a great opportunity for hobbyists to showcase their work. Not to mention you’ll be able to spend time with other local artists and art lovers. Keep in mind, though, that these shows require a good deal of time, effort, and money. You’ll need to buy a booth, set it up, and be there all day during the show. Nevertheless, there are great rewards at the end of it.

Online

If art fairs or art shows aren’t your style, then you can always sell your art online. This is one of the easiest and cheapest ways to sell your work. You can either set up your own website, or you can turn to a site that’s dedicated to artists. Some possibilities include the following:

  • Etsy
  • FineArtAmerica
  • Saatchi Art
  • Shopify
  • Amazon

However, just because it’s online doesn’t mean it’s free. You’ll have to pay for your own website, and if you turn to an art site, you may have to split the profits with the company.

Retailers

Local retailers are always looking to showcase work done by local artists. While you may have to buy space or split the profits with the store, it is still an excellent way to get your art out into the world.

Social Media

Finally, there’s always social media. We don’t recommend only relying on social media, but instead using it to send potential customers to your website or a local show. Social media helps with exposure, and it can be a great way to advertise yourself to your local community. Share TikTok videos of your artistic process, or post Instagram photos of your latest work to attract future fans.

Are you looking to jumpstart your artistic career? Then take one of our classes or workshops here at Creative Ventures Gallery.

Everything You Need to Know About Edges in Art

Everything You Need to Know About Edges in ArtEdges in art mark the end of one color and the beginning of another. Sometimes the transition is sharp, like that between one object and another; other times, the transition is subtle, like the gentle gradations of an evening sky. The concept of edges is deceptively simple, as many beginner painters struggle to capture a perfect edge. However, by better understanding the concept itself, you can learn how to paint the right edges for your painting.

The Different Types of Edges

What usually throws beginners off is that they’re using an inappropriate edge for the object or color they’re trying to depict. When we think of edges, we often imagine something sharp and distinct, like the edge of a countertop. In reality, there are three main types of edges you can use in your art:

  • Hard Edge: A sharp, crisp line between two shapes or objects (e.g., the line between an apple and a table)
  • Soft Edge: A more gentle and smooth transition between two shapes or objects (e.g., the transition between the top of a table and the corner of a table)
  • Lost Edge: A barely distinguishable and extremely subtle transition (e.g., the transition between the light part of the table and the shaded part)

What Forms an Edge

You create an edge any time there is a change in your painting. This can include a change from one object to another, one color to another, or one plane to another. Simply put, any kind of transition involves an edge, whether it be hard, soft, or lost.

Factors That Influence Edges

What might make a hard edge hard, or a soft edge soft? Typically it’s the actual object you’re trying to paint. However, environmental factors also influence your edges. These four factors can change the type of edge you use in your painting:

  • Light: Harsh light will make an edge harder, while weak light will make it softer
  • Movement: When something is moving, edges will appear blurred or softer
  • Atmosphere: A sunny day will make edges harder, while a hazy day will make them softer
  • Focus: Objects that are farther away are out of focus. As such, their edges will be soft

At Creative Ventures Gallery, our art classes and workshops can teach you the fundamentals of edges. To learn more, contact us today.

What is the Mother Color Technique?

What is the Mother Color Technique?

Almost every painter wants to achieve color harmony. There are many ways to do this, but one of the most popular is the mother color technique. But what is this technique, and how can you use it? Read on to learn more:

Defining the Mother Color Technique

The mother color technique is a method that relies on using one color—a mother color—that is incorporated into every other color in a painting. For instance, if you’re painting a snowy landscape, your mother color would be white, and you would mix that white into all of your other colors. This technique can be used with nearly any kind of painting, from watercolor to plein air.

How to choose your mother color

Since your mother color will be incorporated into all of the colors in your painting, choosing the right one is important. In theory, you can choose any color you wish, but it’s often best to choose your focal point color. With the snowy landscape example above, the focal point of the painting would be the snow. As such, the white from the snow was mixed in with all of the other colors.

Only mix a small amount

If you want to try your hand at the mother color technique, be careful not to use too much of your mother color. You need to achieve color harmony while also having enough contrast between each color in your painting. In that respect, mix only a small amount of your mother color with each paint color. You can always add more later.

At Creative Ventures Gallery, we cover many artistic techniques. Check out one of our many classes or workshops to get started on your artistic journey.

Understanding the Different Paintbrush Shapes

Understanding the Different Paintbrush Shapes

Paintbrushes come in all shapes and sizes. From round brushes to fan brushes, there are a wide variety you can choose from. The paintbrush shape you do choose, though, will depend on what it is that you’re painting. Acrylic, for instance, needs a different paintbrush than watercolor. Additionally, you can’t use a large fan brush for painting small details.

Here we discuss each paintbrush shape to help you decide which one is right for your next painting:

Round

Round brushes are thin and small with a rounded or pointed tip. Their bristles are gathered close together, making them an ideal brush for painting details or smaller areas of your work.

Good For:

  • Details
  • Thin or thick lines (add pressure to add thickness)
  • Filling in small areas
  • Outlining
  • Sketching
  • Controlled washes

Rigger

These look similar to round brushes, and indeed they are used for similar purposes. Nevertheless, a rigger is longer and thinner, thus able to achieve even finer details than a round brush.

Good For:

  • Very fine details
  • Lettering
  • Calligraphy
  • Delicate areas
  • Spotting or Retouching

Flat

As the name suggests, these types of brushes are flat and rectangular. They are extremely versatile, able to work with various methods and paints.

Good For:

  • Filling in medium to large areas
  • Bold strokes
  • Washes
  • Impasto
  • Fine lines by using the edge of the brush

Bright

Similar to the flat brush, bright brushes are flat and rectangular but curve inwards towards the tip. They have short and stiff bristles that work well with heavy body paints.

Good For:

  • Thick lines
  • Heavy colors and paints
  • Short strokes
  • Working up close

Filbert

Narrow and rounded at the top, filbert brushes add a soft touch to your painting. They are flat and have medium to long hairs.

Good For:

  • Soft edges
  • Blending
  • Details

Fan

With hairs spread out flat like a fan, it’s no wonder how the fan brush got its name. They can cover a wide area with a light touch.

Good For:

  • Blending
  • Feathering
  • Texture
  • Natural elements (clouds, leaves, etc.)
  • Smoothing

Angular Flat

This is a flat brush where the tips of the bristles are cut at an angle. The tip of the brush allows you to paint in corners you otherwise couldn’t reach.

Good For:

  • Filling in corners
  • Curved strokes
  • Small areas
  • Large areas

For more advice on choosing the best paintbrush for your next work, sign up for a beginner’s painting class here at Creative Ventures Gallery.

The Benefits of Thumbnail Sketching for Artists

Every artist looks for ways to improve their skills. One proven method is thumbnail sketching. These small, simple sketches are made quickly and with no corrections. They force the artist to rely on their memory and to work on crucial elements such as lines, shapes, curves, and more.

Here are some more reasons why you should be practicing thumbnail sketching:The Benefits of Thumbnail Sketching for Artists

It leaves room for experimentation

Since an artist can complete thumbnail sketches quickly, you can experiment with different methods without losing much time or effort. If something doesn’t work, you move on and forget your sketch. If it does, then you have something that you can use in more serious drawings or paintings.

Thumbnail sketching reduces overthinking

While planning things out is certainly beneficial, the more time you spend analyzing and thinking things over, the less likely it is that you’ll ever finish a project. This phenomenon is often called “Paralysis by Analysis,” and it can kill the creative process. Thumbnail sketches, meanwhile, are so quick and straightforward that they let your creativity flow without being weighed down by overanalyzing.

It helps you flesh out ideas

When you combine the ability for experimentation and the freedom from overthinking, you have an opportunity to flesh out your ideas fully. This is especially helpful if you’re creating a character or object that doesn’t exist in real life. A thumbnail sketch can help you get your ideas on paper to see which ones work and which ones don’t. It can also help you formulate new ideas when you let those creative juices flow.

At Creative Ventures Gallery, we have plenty of classes that can help you better refine your thumbnail sketching. To learn more, contact us today.

How to Draw from Your Imagination

Drawing from your imagination can be harder than you think. If you sit an apple down in front of you, you can see for yourself how the light falls across its surface, or how its shadow stretches out across the table. When drawing from your imagination, however, you need to make up for yourself how those lights and shadows affect the apple without it appearing fake.

While learning how to draw from your imagination can be difficult at first, it’s not impossible with a little bit of practice. Here are some tips to get you started:How to Draw from Your Imagination

Use real life observations

Having a solid understanding of how the real world looks and works can help you when drawing from your imagination. Even if you’re drawing a creature that doesn’t exist, like a dragon, you still need an understanding of wing anatomy or how scales shimmer in the light in order for your drawing to appear realistic. Study the anatomies, lights, and shades of similar objects to get a further grasp of what your own object may look like.

Have a firm understanding of linear perspective

Linear perspective is a crucial technique for any artist to learn. It helps in making a two-dimensional setting look three-dimensional. Without a firm understanding of this concept, you won’t be able to make any drawing—based on real life or not—look realistic. Mastering linear perspective, then, will get you one step closer to learning how to draw from your imagination.

Understand light and value

In addition to mastering linear perspective, you should also master light and value. Being aware of how light travels and alters an object can help you create a realistic object. Additionally, understanding value is a key element in creating meaningful art. It will teach you how dark or light a certain color appears in a certain situation.

With time and practice, anyone can learn how to draw from their imagination. However, it always helps to have a teacher guiding you through the process. At Creative Ventures Gallery, our art classes and art workshops can help. Contact us today to learn more.

Choosing the Best Painting Medium for Beginners

Now that you’re comfortable with drawing, it’s time to start thinking about painting. But where do you start? From acrylic to watercolor to oil, there are many painting mediums for you to choose from. Finding the right one, however, can be difficult, especially for beginners who may not know everything there is about each type.

To help you narrow down your choices, we’ve listed a few questions you should ask yourself before choosing your first painting medium:Choosing the Best Painting Medium for Beginners

Which style do you love the most?

Have you always found yourself drawn to watercolor paintings? Or maybe there’s something about acrylic that speaks out to you? When picking a medium, you should always take into account your own personal preferences. If you enjoy looking at a watercolor painting, for instance, then you’ll likely enjoy painting a watercolor as well.

Are there any circumstances that might make a certain medium difficult to deal with?

Say, for instance, that you want to try your hand at oil painting, but you start to notice that the canvas takes up much needed space in your tiny apartment. This can be extremely difficult to deal with, especially if you have other people or pets living with you. You may instead choose a medium that takes far less time to dry, allowing you to pack up your canvas and painting supplies when you’re not using them.

Which medium is easiest?

There is steep learning curve with any painting medium, but some have less of a curve than others. Acrylic is typically the easiest for beginners, while watercolor is the hardest. However, if you hate working with acrylic, don’t force yourself to paint it just because it’s easier. It’s far more important to find a medium that you enjoy. Plus, you can always find an art class or art workshop to help you in the early stages.

At Creative Ventures Gallery, we have plenty of beginner painting classes to help you learn your chosen medium. Sign up for a class today to get started!

The Elements of Composition in Art and Design

Take a look at a work of art. What do you see? You likely notice characters, actions, and scenery, but if you look a little closer, you will notice movement, contrast, patterns, and balance. These are the elements of composition—various visual elements that make up a painting or drawing. They are not to be confused with the elements of art, which include lines, shapes, colors, values, etc.  

There are 8 elements of composition in art and design, and they are as follows: The Elements of Composition in Art and Design

  • Balance focuses on the symmetry or asymmetry of a work of art. A symmetrical painting, for instance, will feel calm and balanced, while an asymmetrical painting will appear chaotic and unbalanced. 
  • Unity, or variety, asks how diverse or monotonous a particular work of art appears. In other words, do the objects of your painting or drawing fit together? Or does something seem out of place?
  • Contrast is the difference or juxtaposition of various elements of art. You can have contrast between light and dark, circles and squares, or any other seemingly different elements.
  • Focus, or emphasis, is as it sounds—it’s the focal point of your artwork. When someone views your painting, their eye will automatically gravitate towards a specific subject. That is the focal point.
  • Pattern is the repetition of certain shapes, lines, colors, or elements. Practically anything can be turned into a pattern just as long as it repeats throughout the painting or drawing.
  • Movement is the illusion or sense of motion (or lack thereof) throughout a piece of art. For example, a scarf blowing in the wind portrays movement, while a cup sitting on a table portrays stillness.
  • Rhythm relies on movement, as it uses the sense of motion to create an organized repetition of artistic elements. It is often confused with pattern, but while patterns are consistent (the same shape over and over again), rhythm includes variety (different shapes repeated in a similar order). You can think of it as rhythm in music where there is a consistent, underlying beat but with various notes.
  • Proportion is how different subjects or objects relate to one another. By using linear perspective, you can make objects appear large or small, nearby or distant.

Understanding the elements of composition in art and design is one way to elevate the quality of your artwork. To learn more about how to use these elements, sign up for a beginner’s art class here at Creative Ventures Gallery today!

How to Use the Horizon Line in Your Artwork

For any type of artwork, the horizon line is an essential part of making your art more realistic. It helps you to scale the subjects in your drawing or painting properly, and it provides a sense of three-dimensionality to a strictly two-dimensional surface. As such, understanding what the horizon line is and how it works is one of the first steps you need to take in improving your artwork.  

What is the horizon line?How to Use the Horizon Line  

In a drawing or painting, the horizon line is the point where the earth meets the sky. It is always at eye-level—no more and no less. While not all works of art depict the horizon (after all, plenty of paintings and drawings feature interior settings rather than exteriors), artists will create an eye-level line to ensure that the subjects are in the proper perspective.   

Why do we need to use it?  

Simply put, a horizon line helps us to create perspective. Linear perspective is an artistic technique that makes a 2D surface appear three-dimensional by creating an illusion of depth. Think about it. Objects that are farther away from us appear small, while objects that are closer to us appear big. Thus, to make a painting or drawing realistic, we have to replicate this by making subjects that are further away smaller, and items that are closer to us bigger. We can do this by creating a horizon line with a vanishing point as a point of reference.  

Horizon lines and linear perspective are crucial techniques for beginner artists to learn. At Creative Ventures Gallery, our beginner drawing classes can teach you the basics of horizon lines, linear perspective, and more so that you can reach new creative heights. Give us a call today at 603-672-2500 to learn more.